Monday, May 23, 2016

Romantic Ivy-Filled Birdcage


I've always wanted to make a birdcage planter for my front porch. This Victoria Day Weekend I finally got the job done! Here's how I made it:


What you need to make this project:

• Decorative birdcage
• A selection of shade annuals: I used 3 small pots of ivy, one plug tray of trailing lobelia and one fuchsia
• A large bag of dried green moss (not shown above)
• A length of dried coconut liner
• Potting soil
• Scissors
• Permanent marker
• Garden gloves


Just a quick on the birdcage. Select a birdcage with a wire rather than solid bottom, if you can. The wire bottom will allow better drainage. I also chose a birdcage that opened from the top and came with a hook for hanging the finished planter.

Messy project warning: This project does create a bit of a mess, so work outside or somewhere inside that will be easy to clean up afterward.


Step 1: Roll open a length of the coconut liner. Place your birdcage on top, and with a permanent marker, trace the outline of the bottom of the cage.


Step 2: Cut out the shape of the birdcage with your scissors. Open the birdcage and place the coconut liner at the bottom of the cage.


My first idea was to use the coconut liner for the sides of the birdcage planter, but I found it cumbersome to work with in the tight space available inside the birdcage. 

So to protect the roots of my plants and to fill in the sides of my planter, I used a bag of dried green moss that I purchased at the craft store. Moss makes the sensitive skin on my hands itch, so when working with it, I always use gloves.


Step 3: Working with the moss is where this project starts to get a bit messy. 

With your birdcage open, begin to pack a thick layer of moss around the bottom two inches of the birdcage. Be generous with the moss! You don't want the soil in the birdcage to drain away every time you water the planter.


Now you are ready to incorporate the first of your plant materials. I wanted to hang my birdcage on my front porch, so I chose plants that would be happy in part-shade: ivy, trailing lobelia and fuchsia.

If you wanted to make something similar for sun, try a full sun vine instead of the ivy. For the flowers you could also use petunias, a small trailing geranium or any other full sun annual of your choice.


Step 4: To begin the planting, start with the small plugs of trailing lobelia. I found it easiest to place the root ball of the lobelia inside the birdcage first and then work the tailing stems of the lobelia gently through the birdcage bars.

Once you have added the lobelia, put another half inch or so of moss on the sides of the cage. Place the ivy root ball inside the cage and tread the ivy through the bars of the cage as you did with the lobelia. Once the ivy is in place, build up the sides with the moss about another 3/4 of an inch. Add the small fuchsia to the centre of your planting. 

Fill an spaces between the plants with potting soil.


Step 5: Next, hang up your cage, so you can see the sides clearly. Fill any gaps with moss. Don't discard any surplus moss! If any gaps appear with repeated watering, add a little of the surplus moss to fill any gaps.

Step 6: With a light spray of the garden hose, give the birdcage planter a good soak.


Hang the birdcage and enjoy!

Tuesday, April 19, 2016

Faux-Succulent & Neutral Pistachio Nut Wreath


In my last post I showed you how to make florets with pistachio nut shells. In this post, we'll advance the technique and make a wreath.


To make the Pistachio Nut Wreath you need:

• Wreath form

• Low heat glue gun

• Glue sticks

• Pistachio nut shells

To make the Faux Sedum version of the wreath add these items to your materials list:

• 2 different colors of green multi-surface spray paint

• Small bottle of rose colored craft paint

• Paint brushes

• Old newspapers and some paper towel

• Mask (for protection from paint fumes while using spray paint)

A note about hanging your wreath:

Before beginning this project, you may want to give some thought as to how you want to hang your finished wreath. For my wreath I simply created a loop of heavy duty fishing wire. Alternatively, you might create a loop of decorative ribbon and tie a bow on the top of the ribbon. You could also fashion a hanger with some florist's wire.

Getting Started:


Step1: Eat some pistachios! Clean away any residual brown nut husks from the insides of the shells before you start your wreath.


2. Using the technique that you learned in the last post, make your first floret on the styrofoam wreath form.

3. Shift down and to the left and make a second floret. Move down again and slightly the right to make a third floret.


Step 4: Go back and fill in the spaces between the first three flowers with new florets. When you are finished shift down and make the next three florets.


If it makes it easier, you can take a permanent marker and make flower sized circles on your wreath to serve as a guide.


Continue working in a single direction around the wreath filling it up with florets as you go.


I am sure you must be wondering what happens on the sides of the wreath form. Create full florets where you can, but where you don't have the space available, make semi-circular florets instead.


One of the somewhat annoying things about working with hot glue is all the fine web-like strands of glue you end up creating. 

Clean away these little spider webs of hot glue with a soft paint brush. This is particularly important if you want to carry on and paint your wreath. The strands of glue will become more evident after you spray paint your wreath.

If you want to leave the wreath a neutral color, all you need do now is hang it!


Transforming your creation into a faux-succulent wreath is basically a matter of painting it.


I used two colors. One is a brighter green: #85082 Tropical foliage. The other is a dusty blue-green: 85084 Leafy Rise. If you can't find these exact colors, just look for greens that are similar.

The final painted look of the three colors together.

Move outdoors or to a well ventilated area. Lay down some old newspapers- this will get messy! Before you paint, put on a face mask, so you don't breath in any paint fumes.

Start with the bright green. (Tip: Shake the can to mix the paint really well.) Spray the whole wreath bright green. I moved around in a circle to spray the paint in a variety of directions. It may take a number of attempts before you have every nook and cranny of the wreath painted green.

Now comes the somewhat tricky artistic part of the paint process. (But I know you have the talent to pull it off!)

Take the other can of blue-green spray paint and spritz it lightly here and there. These should be short, uneven bursts of paint. Basically, you are accenting the wreath with this second color.

Switch back to the brighter green and spritz a few bright accents on top of the last blue-green layer of paint.


For the final step, add some rose accents to the green wreath. Many succulents have a blush of rose and that is the look you are aiming to imitate. 

To add these rose accents I simply used a bottle of rosy-pink craft paint.

The application of the rose paint uses a dry-brush technique. Put some paint on your brush. Now take a piece of paper towel and wipe most of the rose paint off the brush onto the paper towel. Then drag the "dry" brush across the surface of the wreath allowing the paint to catch here and there.

And that's it. Your done! 


Hang your finished wreath and enjoy!


Friday, April 15, 2016

Pistachio Florets: Using the Basic Technique to make a Trinket Box


My husband adores unsalted pistachios. He could eat the better part of a bag of them if I didn't stop him! 

When he done, there is always a little pile of the discarded beige shells. Poking around on Pinterest one evening I came across a idea for making florets with pistachio shells. It was just the inspiration I needed to get crafty.

Because I had lots of shells available, I came up with a wreath project that takes making nutty florets to a whole new level. Before I get to my wreath design however,  I thought it might to be best to demonstrate the basic technique for making pistachio florets with a simple project. Hence this little trinket or gift box project.


To make the Decorative Box you need:

• Either a cardboard or wooden box of your choice

• Low heat glue gun

• Glue Sticks

• Pistachio Nut Shells (clean and remove any residual brown nut husks from the insides of the shells before you begin)

• Multi-surface spray paint

• Mask (for protection while using spray paint)


How to:

1. Pick out three small shells. The hollow curved part of the shells always faces inward. 

Take your glue gun and make a small blob of hot glue in the centre of the box top. Place the three shells upright into the glue. You may have to hold the shells for a few seconds until the glue sets.

2. Make a semi-circle of glue to one side of the centre group. Into your semi-circle of glue, place three more shells at a less upright, slightly more open angle.


3. Make a second semi-circle of glue on the other side of the centre group. Into this newest arc of glue, place three more shells on the same angle.

4. To make the next row of petals, add yet another semi-circle of glue and use four shells this time. Relax the angle of these newest row of shells to be a bit more open. Use the same process to add four shells on the opposite side.


5. Keep building out your flower until you are happy with its size. (Tip: I tend to use slightly larger nut shells as I build out the flower.  The angle of the shells should get more and more relaxed and open as you reach the outer petals of your flower.)


6. Move outdoors or to a well ventilated area. Lay down some old newspapers- this is about to get messy! Before you paint, put on a face mask, so you don't breath in any paint fumes. Then use a multi-surface ivory spray paint (or color of your choice) to paint your box.


I kept my trinket box all one color, but you could always paint the flower a different color if you like. 
This floral box could be a perfect place to store earrings or bracelets. It could also make a great party favour or gift box.


Now that you have the basic technique down for making the florets, you may want to tackle a bigger project like this wreath.


I'll post full instructions shortly.


With a little paint you also have the option to create a faux-succulent version of this wreath.

Saturday, March 19, 2016

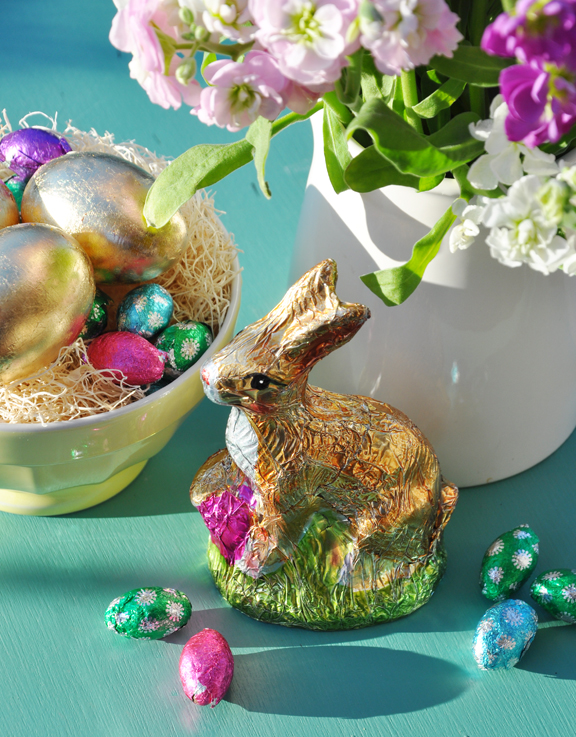
Gold Foil Easter Eggs


Over the last couple of years I have collected a few Easter bunnies that 
look like foil-wrapped chocolate.


They remind me of childhood Easter presents that included some chocolate 
and a bright pink skipping rope.


I found my Easter bunnies at Home Sense (I believe the American equivalent is Marshalls).


To create a pretty display this Easter, I thought it would be fun to make some faux foil-wrapped chocolate eggs to sit in a dish or basket alongside my rabbits.


If you ever wanted to try your hand at gold leafing, this is an easy project with 
which you can gain some experience.


To make these Easter Eggs you need:

• Plastic Eggs (I used an egg decorating kit that I bought at Walmart).

• A paint brush to apply the base coat paint, adhesive and sealer.

• A gold leaf kit (I found my kit at Michaels. You could also buy gold leafing materials separately if you prefer).

• A soft, wide brush to use to smooth the gold leaf.


Step 1: Apply a base coat of paint to your plastic egg. The purpose of the base coat is to fill an tiny gaps in the finished gold leaf. In the kit I purchased, this base coat was a burgundy color, but you could use any color you wish to have peak through the gold.

(Tip: I found it easiest to paint one half length of an egg at a time, let it dry, and then do the other half. Paper towel was a good, non-slip surface to work on).


Step 2: Apply the adhesive with a paint brush. Again, I did a half length of each egg at one time just to make things easier.

Step 3: Let the adhesive dry and become tacky. This glue will catch the thin gold leaf and attach it to the egg.


Step 4: Detach a sheet of gold leaf and the wax paper backing. Smooth the gold leaf over the surface of the egg with your fingers or a wide, soft brush.

Small pieces may break off as you do your smoothing. I used these smaller pieces to fill in any gaps in the gold leaf.


Step 5: Now all you have to do is apply a sealer coat to protect the gold leaf and your done!


Have fun decorating for Easter!

Monday, February 29, 2016

DIY Cloche Stand


When I found this owl in a local shop it looked a little like a wood carving, but in reality it was plastic. It occurred to me that the owl might look more elegant, if it was painted it. So I spray painted it ivory (using one of the new spray paints that adheres to plastic).

The glass dome or cloche came from a tacky thrift shop clock. 

When I put the owl under the glass dome it seemed unfinished, so a came up with a little DIY stand. Here is how my husband and I made it:


A Note about the Materials: The wooden circle and pedestal were purchased at Michaels in their wooded craft isle.

A few Notes about the Method: You could simply glue the two pieces of wood together with a good quality wood glue, prime and paint the finished stand, but the bond between the two pieces of wood wouldn't be particularly strong.

If you have the patience, this longer more sturdy method of joining the two pieces of wood will create a much stronger finished piece.


To make the Cloche Stand you will need:

• A wooden circle with a routed edge (Michaels)

•  A wooden pedestal (Michaels)

• Gorilla or Wood Glue

• 1/8" Dowel

• Measuring Tape

• Pencil

• Punch

• Electric Drill and 1/8" drill bit

• Wire cutters

• Primer (if you aren't using a paint & primer in one)

• Latex Paint in a color of your choice (I used ivory paint).

• Varathane Professional Clear Finish 'Satin' (water based)

Step 1: You could use the Michaels wood pedestal as is, but I thought the it was a bit high for my purposes, so I had hubby twist the bottom section off. The original pedestal was held together with a light bit of glue, so the it easily broke into two sections with a few twists of the wrist.

Set aside the bottom section of the original pedestal for some other project. Turn the remaining half upside down. What was once the pedestal's top, now becomes the pedestal's bottom.


Step 2: Prime the pedestal and the wooden circle. The circle will be used to make the top of the finished stand.

Step 3: Next you have to calculate the centre of your pedestal top. Do you remember your high school geometry? Me neither! Thank goodness this isn't as hard to figure out as it looks!

Turn your wood circle over so the underside is facing up.

Take your measuring tape and swing it in an arc around the circumference until the markings on the tape measure line up with the outer edge of the circle. My tape measure lined up at 6" making 3" the centre of my wooden circle.

Step 4: Repeat the process on the diagonal. Make another mark with your pencil to create an X to indicate the circle's centre.


Step 5: A drill can easily slip, so it is a good idea to use a punch to make a shallow hole to guide for the end of drill.

Step 6: You don't want to drill a hole all the way through your top, so it is also a good idea to look from the side and get a basic idea of how deep the drill needs to sink into the wood.


Step 7: Drill a hole to a depth of approximately 3/16".

A small piece of dowel linking the top and pedestal base will create a strong join.

Step 8: Now you need to calculate the length of the dowel required to make the join. Insert the end of your dowel into the pedestal and mark the depth of the drill hole with a pencil.


Step 9: Add another 3/16" (which is the depth of the hole you drilled into the stand's top). Mark the combined depth you need to accommodate the top and pedestal base with a pencil.


Step 10: Take a pair of wire cutters and twist the dowel to score the final pencil line. Now cut the dowel with the wire cutters.


Step 11: Put some glue on the end of the dowel and insert it into the top of the pedestal.

Step 12: Once the dowel is in place, put more glue on the exposed end of the dowel and on the underside of the circular top.


Step 13: Join the circle top and the pedestal together. Twist the top piece with a circular motion to spread the glue. Set the finished stand aside and allow the glue to dry.

Step 14: At last you can paint the finished pedestal stand!

Step 15: Optional: I like to add a clear top coat just to make the finished piece more durable. If you opt to do this as well, brush on a top coat of water based Varathane. Allow it to dry.


And there you have it! A nice stand that can give your cloche that extra bit of style!