Tuesday, January 26, 2016

The Interior Design Show 2016


If you were decorating a living room, and money was no object, where would you start?

Most designers would probably tell you they'd start with a fabric or a key piece of furniture. Me, I'd start with a great piece of art. 

I know, I know, this is backwards thinking to the way most designers work. Whenever I see those decorating shows on TV, artwork is practically an afterthought. Most good designers wouldn't go so far as to choose artwork that matches the sofa, but co-ordinating a piece of art with the decor seems to be foremost among their thoughts.

For me, it is a little deciding on a red sports car because, the red car will work perfectly with the style and color of your house when it sits in the driveway. 

Artwork is always such a personal choice and has such a dramatic impact on a room, I'd always put it first.


One of the next things I think I'd purchase is an amazing rug. These were rugs I saw yesterday at the Interior Design Show in downtown Toronto. I thought they were a fabulous colors mix of colors!

With a statement making choice like one of these rugs, I'd keep the sofa and chairs quiet and neutral. I'd even be tempted to keep accessories neutral. For a person like myself who loves color, this would call for some restraint, but I think it would let the room's key pieces really shine. Wood furniture for my imaginary room would be an curated mix of modern pieces and antiques. 

It's fun to daydream isn't it? Certainly there was lots of inspiration at IDS to fuel those imaginings.


We arrived at Toronto's IDS in the afternoon on the final day of the show. Our furnace (which is actually a boiler, as we have hot water heating) began making loud rumbling sounds at 3 am the night before.

It honestly sounded like the boiler was about to explode! My husband made a panicked trip to the basement only to find one of the boiler's pumps was overheating. Even though Harold flipped off the switch to the boiler immediately, the smell of the burning pump filled the house. Calls to the gas and heating company in the wee the hours of the morning ensued. We finally crawled back to bed around 4am, only to have to get up to greet a repairman at ten.

By the time we made it downtown for the interior design show, it was late in the day. 

Andrew Richard Designs usually has a huge display booth. This year's effort was 
modest in comparison.

What were my impressions of the show? 

To be brutally honest, IDS 2016 seemed somewhat diminished in scale and ambition from past years. 

These recessionary times seem to have really taken a toll on large industry shows like this. Nobody seems to have the budget any more for the expensive show displays. I noticed lots of retailers (like Ikea) were missing from previous years.  

There also seemed to be a noticeable lack of show displays.

Urban Barn's casual dining display

I hate to be overly negative however, we had a good time at IDS. What booths and displays we visited, we did enjoy seeing.

Urban Barn: Reclaimed pallet-style furniture, rustic signs, pops of orange 

Urban Barn's bedroom display

More Urban Barn, this time with a garden theme.


What trends did we see? Big scale light fixtures seem to continue to be a hugely popular.


These large scale metal fixtures had an almost organic feel that made me think of molten bubbles.


These glass light fixtures reminded me of the ones you used to see in old department stores or industrial spaces. I could imagine them in a large entryway. 


I am calling this trend "stick lighting". Spiky starbursts and stylized twig fixtures seem to be one of the most popular mainstream trends in lighting. 


One of House and Home's Ten Trends for 2016 is peg-leg furniture. 

Chairs with skinny legs were certainly in evidence at the show. I not sure that peg-legs are a trend though. I think that its more likely a fad that will come and go quickly.


Furniture inspired by the 60's and 70's has been trendy for a few years now. 

Unlike the chairs with skinny legs, I see this as a trend that is more likely to have a long term appeal.


The two-man furniture company Coolican & Company seems to be a Canadian success story. I remember seeing their stools in the up-and-coming section of IDS a few years back. This year they were in the main part of the show with a big display.

Not everyone will like their spare aesthetic, but there is a certain classic appeal to their furniture designs.


More evidence of that retro-modern look is still hot amongst the under-forty crowd.

The trend toward patterned ceramic tiles and patterned rugs doesn't seem to be losing any steam. 

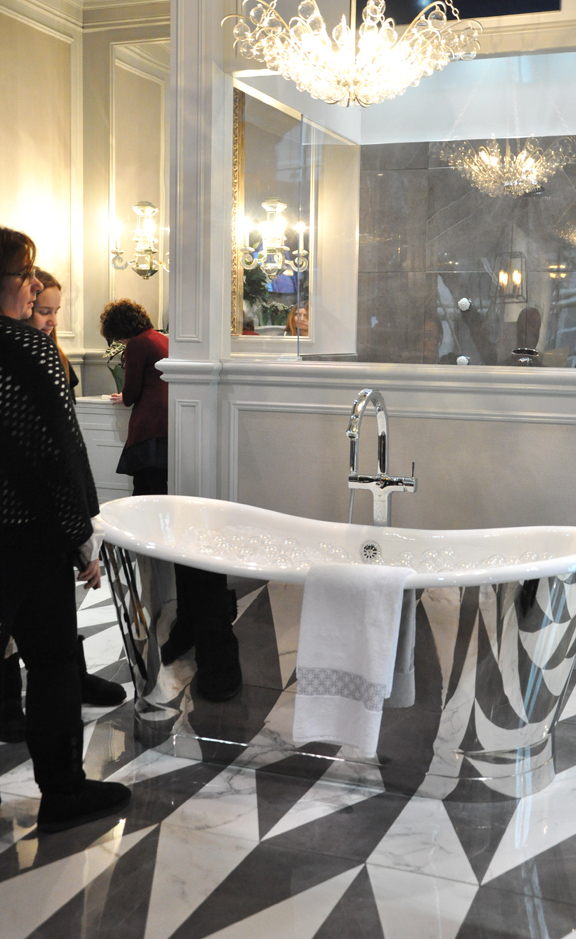
Same is true of these free-standing tubs. For those of us who have long dreamed of having one, the price seems to have become a bit more affordable in recent years.

Before we move away, look at the size of the shower stall in this display bathroom! I find myself at a loss for words.


There was a time when barn door hardware was hard to find. Now it seems to have 
found its way into the mass market.


One of my favourite parts of IDS is the young designer area of the show. There is always something amazing to see there. 

One minor complaint however: Why, oh why, do young designers routinely throw comfort out the window in favour of style? 

None of this furniture looks comfortable!


In conclusion, I hope IDS manages to stay a strong show despite the economy. IDS gives up-and-coming young designers an important chance to showcase their designs. 

And the show is always great way to fill a wintery January weekend!

Saturday, January 9, 2016

How to make a Lavender Sachet


Last year I purchased a lavender plant and nurtured it through the summer. By the end of the season, I had a small harvest of lavender buds. 

I love the fresh scent lavender can add to fine linens and lingerie, so I decided to make a small number of sachets with my modest haul of lavender. When I looked online, I couldn't find a potpourri recipe suitable for a small quantity of lavender. So I made one up. 

This post is the result of my experiment.


Materials you will need to make a sachet:

• Sachet bags (I found sheer white satin bags at Michaels. Look for them in the aisle with the wedding stuff.)

• Ribbon flowers (Again, I found these at the craft store.)

• Needle and white sewing thread

• Scissors

• Paper bag (This will be used to cure the lavender.)

• Blue ribbon (If you plan to hang the sachet.)

• Orris Root Powder (Orris Root Powder is a natural fixative that helps the lavender flowers retain their fragrance. Look for Orris Root Powder at your local health food store.)

• Lavender buds

• Lavender Essential Oil and an eyedropper (Essential oils can be found at health food stores, craft store and online. I purchased the eye dropper at the same place I got the essential oil.) 


No Lavender flowers of your own to work with? No problem, there is still a way for you to make some lavender sachets! 

You may be able to find Lavender flower buds at a local store that are already scented and ready for use. Whole Foods, for instance, sells bags of lavender flowers in their cosmetics department. All you need do in this case, is to fill your sachets.

Lavender flowers are also available for purchase online. With minimal effort, I was able to find an Ontario source for Lavender buds in a matter of minutes: Weir's Lane Lavender Farm. I am sure if you poke around on the internet a bit more, you'll find plenty of other alternates.

A Brief Note on Essential Oils: Not all Essential Oils are created equally. Look for a good quality oil that is 100% pure and has no added ingredients. You can find essential oils at health food stores and there are a multitude of online sources. 


On the main gardening blog, there is a post with tips on growing your own lavender. If you plan to dry your own lavender in the future, it is best to harvest it when the buds are out, but the flowers are not completely open. Cut the lavender flowers at the base of each stem just above the foliage.

Fasten bunches of lavender together with an elastic band. An elastic band is preferable to string because, the elastic band will adjust and tighten as the stems shrink during the drying process. (Tip: The elastic band should be taunt, but not so tight that it crushes the stems.) 

Hang the lavender upside to dry in a cool, dark place. (Sunlight will cause the flowers to fade and lose their color.) 

Lavender will dry in 2 to 4 weeks.


Once the lavender is dry, you can remove the buds and begin to make your sachets.

Before you begin, it is a good idea to lay down a sheet of parchment or wax paper to catch the falling flower buds. 

The lavender buds on a stem of lavender grow in an upward direction. To strip the buds from the stem, I found it best to run my hand in the opposite direction. Simply run your fingers down the stiff stem and the flowers should come away pretty easily. 

The dried flowers will retain a faint scent. The next step will enhance the fragrance.


Gather the flowers into a small bowl. I had exactly 1/4 cup of flowers. Adjust this recipe depending on the quantity of flower buds you have available.

Add 1/2 teaspoon of Orris Root and stir it into the lavender flowers. Natural Orris Root is a fixative used by the perfume industry. It will help the lavender flowers to hold the scent you are going to add next.

With an eyedropper add 3 drops of lavender essential oil. Mix in the essential oil with a spoon.


Pour you lavender flowers into a paper bag. I ended up using a parchment paper bag that generally has culinary uses. (Note: the bag must be paper, which will allow the lavender to breathe. Don't use a plastic bag!)

Tuck the bag alway in a dry place to allow the lavender to cure for 2 weeks.


Once the lavender has cured, you are ready to assemble your sachets. 


Sew a little flower onto the front of your sachet just below the drawstring. I found these ribbon flowers at the craft store.


Fill your sachet with lavender and pull the drawstrings to close it. Tie the bag's drawstrings into a bow.

Your sachet is ready to place in your linen or lingerie drawer. It should keep your fine linens smelling fresh for a couple of months.


Lavender sachets can also be used to freshen a room. 

I like to hang a sachet on the back of a bedroom or bathroom door. 


To make this sachet modification is easy.

Guesstimate the amount of ribbon you will need to hang the sachet. This may vary according to the size of your doorknob. (Tip: It is better to error on the long side. You can always trim the ribbon down, but you can't add to it. I cut my ribbon to be about 10" long.)

Once you have determined the length you need, cut the ribbon with scissors.

Turn your sachet over so the flower on the front is face down.


Determine the midpoint on your ribbon. Place the ribbon at its midpoint on the centre top of your sachet. With a needle and white thread do a few quick stitches to attach the ribbon to the back of the sachet just above the drawstring. 

(Tip: Be careful to only catch the back of the sachet bag with the sewing needle. You don't want to sew the bag closed!)


Turn the sachet over and fill the sachet bag with lavender. Tie the sachet's drawstrings into a bow to secure the lavender in the bag. Finally, tie a bow at the top of the ribbon. 

Use the bow to hang your sachet.


Take a tour a garden filled with lavender and heather on the 
gardening webpage of Three Dogs in a Garden.

Have a wonderful weekend!

Thursday, December 17, 2015

Pretty Paper Rose Ornaments for the Holidays


These little rose ornaments are easy to do and they'd make great last minute gifts.

Here's what you need to make your own flower ornaments:


Materials and supplies you need to do this project:

• clear glass Christmas balls
• paper roses
• sprigs of seeded eucalyptus
• scissors
• wire cutters
• low heat glue gun and glue sticks
• ribbon, decorative string or metal ornament hanger

Just a few words about the materials in this project: Glass ornaments can be found in a variety of shapes at craft stores. I bought round balls and glass hearts.


For the flowers I chose roses, but you could use any type of paper flowers.

Paper roses can be found at craft stores, but I have also found them at the Dollar Store for a much cheaper price. It pays to shop around!


Step 1: We are going to begin this project by making rose buds and individual petals.

Moving around the circumference of a paper rose, gently push back on the outer row of petals until the rose and the row of petals become separated. Snip off the wire stem and set aside the rose bud. Altogether you will need 6 or more rose buds.

Don't discard the outer row of rose petals and leaves!

Separate the leaves and rose petals by gently pulling them apart. Cut the two sections into individual rose petals and leaves.


Step 2: Remove the top of your glass ornament.

Take your wire cutters and snip away the stems of 3 or 4 roses as cleanly and neatly as you can.

Fill the ornament with roses and the petals you made in step 1. (Tip: I glued a couple of roses back to back so they'd way always be facing out from inside the ornament.)

Place the top back on the ornament. Now you are ready to decorate the exterior.


Step 3: Put a dab of hot glue on the back of a rose and attach it to the top front of your ornament. Flip the ornament over and attach another flower on the top back.

Step 4: Centre two more roses in between the first two flowers.


Step 5: Tuck two of the rose buds you made earlier in between the roses at the top of the ornament to fill in the gaps. 

Place one last rose bud just below the centre rose to create a bit of a cascade down the front of the ornament. Repeat on the back, adding a bud just below the centre rose. 

Finish with a couple of green leaves at the sides of each bud.


The final step is the most finicky and involves working with small pieces of Seeded Eucalyptus. 

Seeded Eucalyptus is fairly easy to find. I found this bunch at the grocery store, but it is also commonly available at most florists. 

I fastened the stems of my Eucalyptus together with an elastic band and hung them to dry, as I plan to use the Eucalyptus for other projects. For this ornament project however, we are going to use just the seeds and not the foliage. The seeds of the Eucalyptus are so dry I think you should be able to use them right away, without taking the time to dry bunches of Eucalyptus first.

Step 6: Cut a large branch of seeds into small sections that are about 1/4" long (on the lower right hand side of my step 6 picture there is an example of these small stems)

Touch the seed's stem to the end of your glue gun to pick up the tiniest amount of hot glue. 


Tuck the seeds in among the paper roses.


Use some ribbon to create a hanger, or even easier, attach an ornament hook.


These ornaments would make a great stocking stuffer, hostess gift or present for your child's teacher.


Put your ornament in a pretty box and use more flowers instead of a bow. 
(I hot glued my flowers onto my gift box.)

I am sure any recipient would be thrilled with this heartfelt gift.

Wednesday, December 2, 2015

DIY Wooden Christmas Ornaments


Aren't the best tree ornaments always the homemade ones? 

It's the ones your kids made at school out of popsicle sticks or the ornaments you made yourself that end up having the greatest meaning and hold the best holiday memories.

This year I found some wooden ornaments at the craft store and inspiration struck! Here is what I created:


My first ornament makes use of old chandelier crystals.


Step 1: Start with a wooden ornament. (I happened to find these wooden ornaments at Michaels craft store.) 

Step 2: Paint it white using craft paint or any left over white latex paint you have on hand. (Note: I removed the rough twine hanger the ornament was purchased with to make the painting process easier. I attached a new ornament hanger as a final step in the process.)


Step 3: Paint the edges of the snowflake turquoise. Don't worry of you get some turquoise on the white part of your snowflakes while painting the edge. This is actually part of the look you are going for. 
You can always do a little touch up with a second application of white paint if you are unhappy with any section of the snowflake.


Step 4: Finish with a top coat of transparent glitter paint to add a bit of sparkle to your snowflake.


Step 5: Using a fine drill bit, drill a hole on an angle into the bottom of your snowflake. It is important to work slowly and carefully as the wooden snowflake is delicate.

Step 6: Insert a piece of fine string, fishing line or fine wire into your freshly drilled hole to tie on your crystal. We used a loop of fine wire, which we twisted closed. (Tip: If you don't have a chandelier crystal, search for a similar type crystal in the jewellery section of your local craft store.) 

Step 7: Add a Christmas ornament hanger to the top.


Hang your handmade ornament and enjoy that sparkle that only crystals can add to your tree!


I also created a star ornament using a small tassel.


To make the Star:

Step1: I removed the rough twine hanger the ornament was purchased with to make the painting process easier. 
Paint the wooden star colors of your choosing. I used three non-traditional colors: pink, orange and red. Add a top coat of transparent glitter paint.


Step 2: I found this cord and tassel at the Dollar Store. I cut the cord down to a suitable length for the bottom of my ornament.


I put a dab of hot glue at the bottom of my star and used the glue to attach the tassel. (Tip: Hold the tassel in place for a few seconds to allow the glue to set.)

Then I cut a length of the red cord and used it to hang my ornament.


One final variation on these wooden ornaments. 
This time, I wanted to add the potential for a pleasant jingle.


To make the Ball:

Step1: Paint the wooden Christmas ball colors of your choosing. I used a mix of blues and green. Add a top coat of transparent glitter paint.

Step 3: Using a fine drill bit, drill a hole on an angle into the bottom of your Christmas ball. Work slowly and carefully as the wooden ball is delicate.


Step 3: Using a piece of fine string, fishing line or fine wire to attach a silver jingle bell to your ornament. For my Christmas ball, I used a fine silver string. I looped it through the hole and tied a reef knot to secure my bell.

Step 4: Attach a Christmas tree ornament hanger to the top of the finished ball.


Happy crafting for the holidays!